|

  
|
||
| Show/Hide Hidden Items |
|
|
||
| Show/Hide Hidden Items |
This command allows you to draw a hatch pattern or solid fill:
| a) | between two curves. |
| b) | between a curve and an edge of the graph or a horizontal line with specified Y value. |
| c) | below the curve to the bottom edge of the graph, only for points that are less than or equal to a specified Y value. |
| d) | that fills an area formed by closing a single curve by connecting the first and last points. |
Select the curves to fill between in the 1st Curve and 2nd Curve list boxes. If None is selected for the 1st curve, the fill operation is not performed. To fill an area formed by closing a single curve, select None in the 2nd Curve list box.
The color of the fill may be controlled by clicking on the Color control. Click on one of the 40 predefined colors to select it, or click on More Colors... to specify another color. If Fill to Y= is selected in the 2nd Curve list box, then 1) the primary color becomes optional; if Color Above Yref is not checked then the color control will be hidden; 2) an optional Color Below Yref checkbox is displayed, and similarly, if checked then a second color control is shown that allows you to use a different color for areas below the reference Y value. If when you click OK both Color Above Yref and Color Below Yref are unchecked, the fill will be discarded.
If the User-defined fill pattern is selected, you may create your own hatch pattern by clicking on any of the grid squares in the 8x8 grid pattern. Clicking on a square toggles its state to and from transparent and the color selected with the Color control.
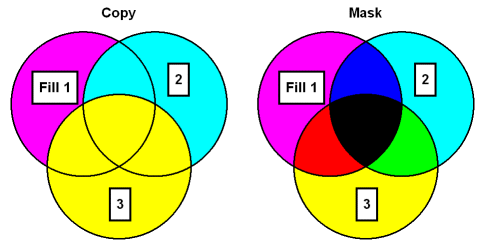
If the Draw only the intersections of all areas box is checked and more than one fill area is specified, then only the overlapping region for all fill areas will be drawn. In this case the color and fill style for the first fill area will be used; all other colors and fill styles are ignored. DPlot will not issue a warning if there is no overlapping area; it will simply not draw any fill. This feature is particularly useful for finding the solution to a set of inequalities. Without Draw only the intersections of all areas checked:
With Draw only the intersections of all areas checked:
|
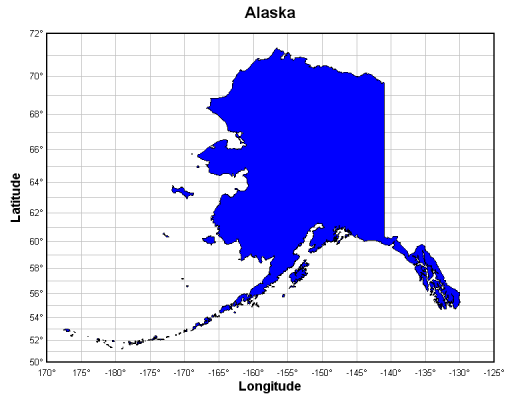
When filling a single curve (2nd Curve set to None), if the Amplitude Limits command on the Options menu has been used to specify a range in Y outside of which points will be ignored, then the fill region will be broken up into multiple segments if any points in the 1st Curve are outside those limits. For example, in this map of Alaska all data points are in the same curve. The file import plugin used to read this file has inserted intermediate points between land masses with Y values outside the range that the plugin has specified for the amplitude limits (in this case +/- 90 degrees).
|
Colors may be drawn with a simple paint operation (Copy, in which case the final color will be the pattern color) or using a mask operation (Mask), such that the result will be a color with r,g,b components common to both the pattern and the destination. For example, magenta (0x00FF00FF) on cyan (0x0000FFFF) results in blue (0x000000FF). In all cases, fill patterns are drawn before all curves; patterns will not obscure a curve nor will fill colors be combined in any way with curve colors.
|
Format codes The formatting buttons simply insert special characters into the text that have specific meaning to DPlot. Use of these buttons is not strictly necessary - you can of course physically type these codes with the same result. Format codes may be nested, so you can have (for example), subscripted Greek characters or subscripts of subscripts. Note that the bold, italic, and underline codes will have no effect if the font already possesses that attribute. In other words, using {\b} on a bold font will not make the font "bolder".
|
|
Related macro commands |
Page url:
https://www.dplot.com/help/index.htm?helpid_fillregion.htm